
As an enthusiastic maker and IoT enthusiast, I have experimented intensively with Meshtastic in the last few months. Meshtastic is an open platform for LoRa-based mesh networks and is perfect for tinkerers who want to chat text-based without internet. It is excellent for outdoor adventures, remote monitoring, or simply for the fun of tinkering.
In this guide, I share my personal experiences with my Meshtastic devices. I focus on the selection and the pros and cons, without diving straight into flashing. Instead, we look at what makes the devices special, and I group them by their microcontrollers (ESP32 and nRF52840). This way, you can more easily decide what fits your projects.
Before we get to the devices, you need to be clear about which frequency bands are used for LoRa in your home country, as there are different regulations depending on the country. In the USA, the 915 MHz band is prescribed here, in Europe 433 MHz or 868 MHz (LoRa Frequencies).

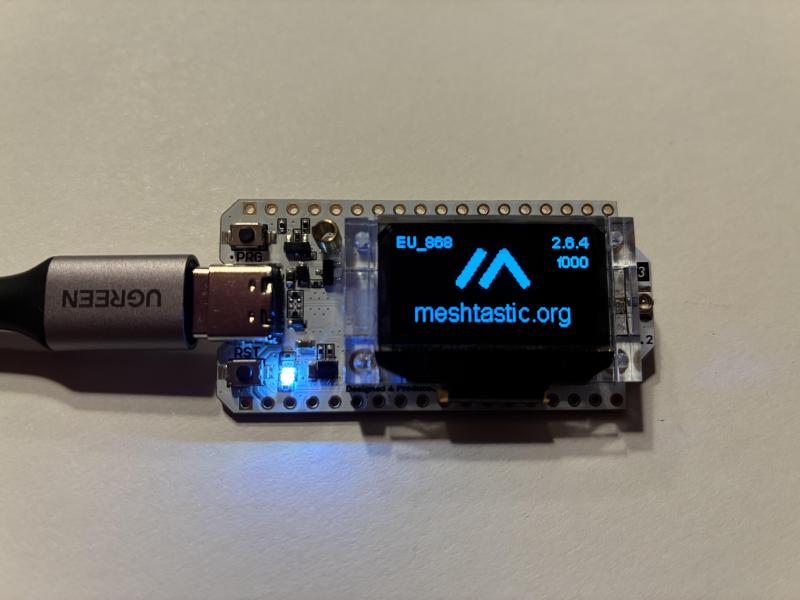
Before we look at the different devices, I recommend starting small. It’s better to buy a cheap board to get an overview of Meshtastic, and you can upgrade later if necessary.
ESP32 Devices: More Features, but Higher Consumption #
The ESP32 is a versatile microcontroller that is found in many Meshtastic devices. It offers integrated Wi-Fi and Bluetooth, more memory for things like range tests, and even a web client. The downside? It consumes more power, making it less ideal for solar-powered remote setups. In my tests, I noticed that the ESP32 is great for everyday use if you often interact with apps or networks, but alternatives score points for long battery runtimes.
LilyGo T-Beam: The Popular Entry #
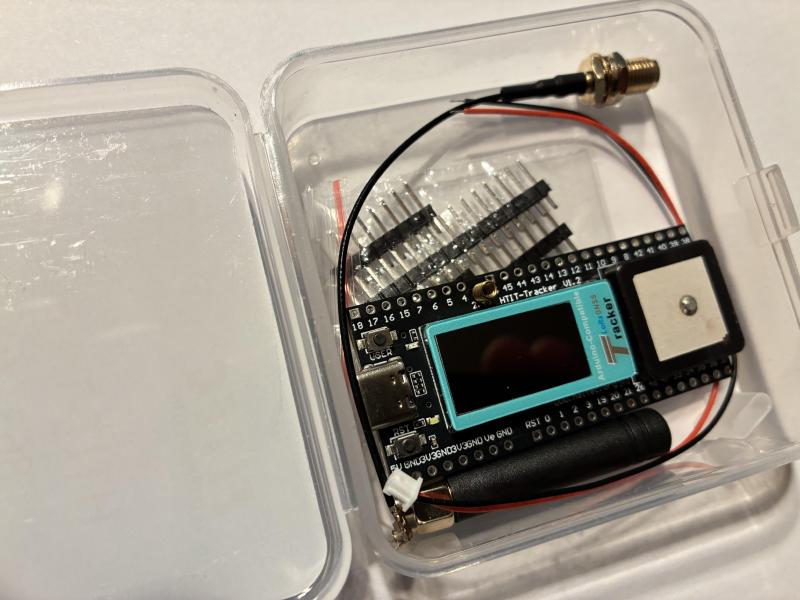
The LilyGo T-Beam is one of the first devices I tried – and it’s popular for a reason. Many YouTubers swear by it, and I can understand that. It’s a pure board without a case, so you have to buy one or 3D print it, and there are already many ready-made designs on sites like Thingiverse or Printables. The T-Beam has an LCD display (sometimes unsoldered, so pay attention), GPS for position data, and in the Supreme version even a BME280 sensor for humidity, pressure, and temperature.
I recommend models with the SX1262 radio, like the T-Beam with M8N GPS or the Supreme. Thanks to the gain boost of the SX1262, significantly higher ranges can be achieved. Avoid older versions like 0.7 or 1.1 without SX1262, often these are sold on platforms like AliExpress under false versions at very cheap prices. With the Supreme, there are two GPS options: The cheap L76K takes about 30 seconds for a fix and is 1-5 meters accurate, while the more expensive Ublox is faster and more precise (down to centimeters). Pay attention to the antenna, often the included antenna is very poor and should be replaced with a specific antenna for 868 MHz.
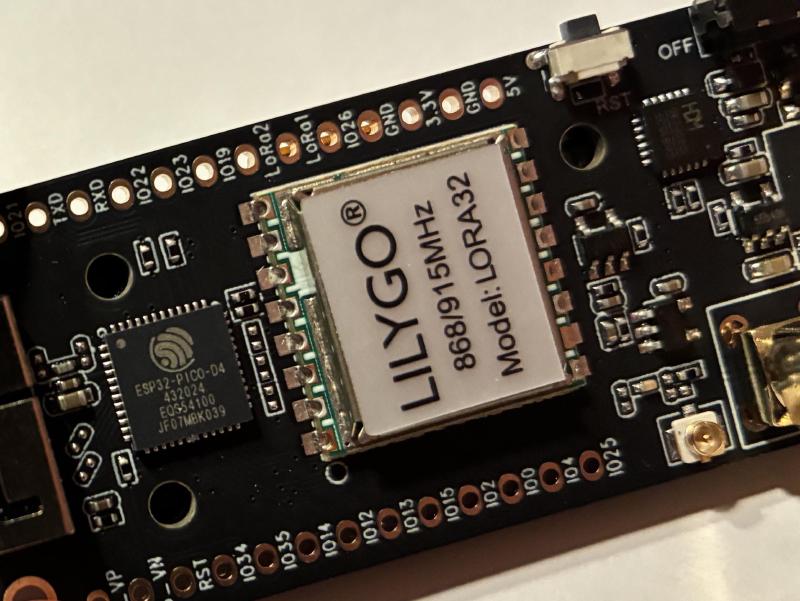
Heltec LoRa 32 Series: Versatile and Proven #
The Heltec LoRa 32 series is a solid choice. I have tested various models, and they work without problems. As with the T-Beam, you shouldn’t fall for cheap deals on version 2.1, as these are no longer supported by Meshtastic. All new Heltecs have the SX1262 built in, so no need to look closely here. No case included, so more tinkering fun.
-
LoRa 32 V3: With display, without GPS – ideal for simple setups.
-
Wireless Tracker: Display and GPS – great for tracking projects.
-
Wireless Paper: E-Ink display, no GPS – energy-saving for displaying, it’s important to use the right version on the Meshtastic GitHub, otherwise the E-Ink display won’t work.
NRF52 Devices: Energy-Saving and Ideal for Remote #
The NRF52 is my go-to for power-saving outdoor nodes. NRF52-based devices only have Bluetooth (no Wi-Fi), but they are super efficient, perfect for solar remote setups. In the further course of the article, I will go into the RAK WisBlock, which is based on the nRF52840.
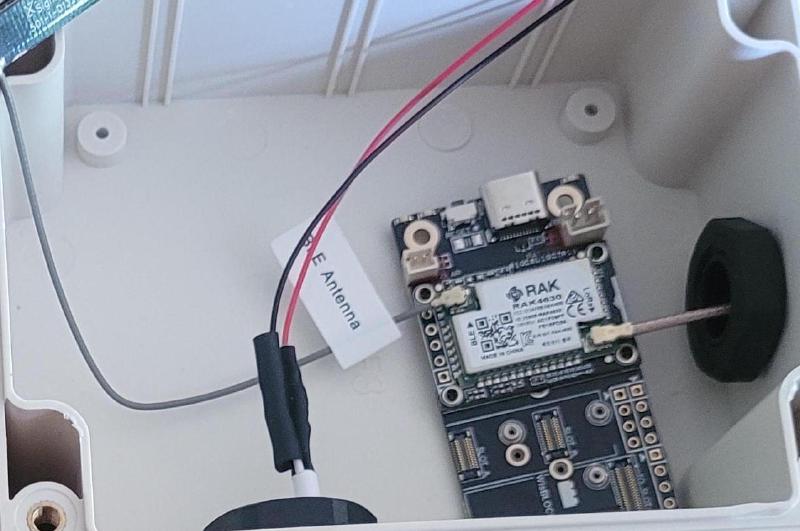
RAK Wireless WisBlock: Modular Dream #
The WisBlock is my absolute favorite, the modularity creates many possibilities to expand your existing setup. It only has Bluetooth (no Wi-Fi), which reaches up to 10 meters for me. The RAK4631 is based on an nRF52840, so the module is very power-saving. The carrier boards have an integrated solar charger (up to 6V panel) and are ideal for outdoor/remote deployments.
You start with one of the base boards for the RAK4631 Meshtastic or directly with the WisBlock Meshtastic Starter Kit 868 MHz for EU. To expand, you simply plug in GPS, BME680 sensor (temperature, pressure, humidity, air quality) or Ethernet. There is a starter kit and all have SX1262. By default, the WisBlock contains no display, but this can be retrofitted if needed. However, to keep power consumption as low as possible, no display should be used.
I have been operating my outdoor nodes for over 5 months now, without failures or problems so far.
In conclusion: Start with what fits your budget and project. I started with the T-Beam and switched to modular ones like the WisBlock. Try it out, tinker with cases, and share your experiences! In the next article, we’ll look at antennas.
Feel free to write me your experiences at blog@lucabolanz.de!